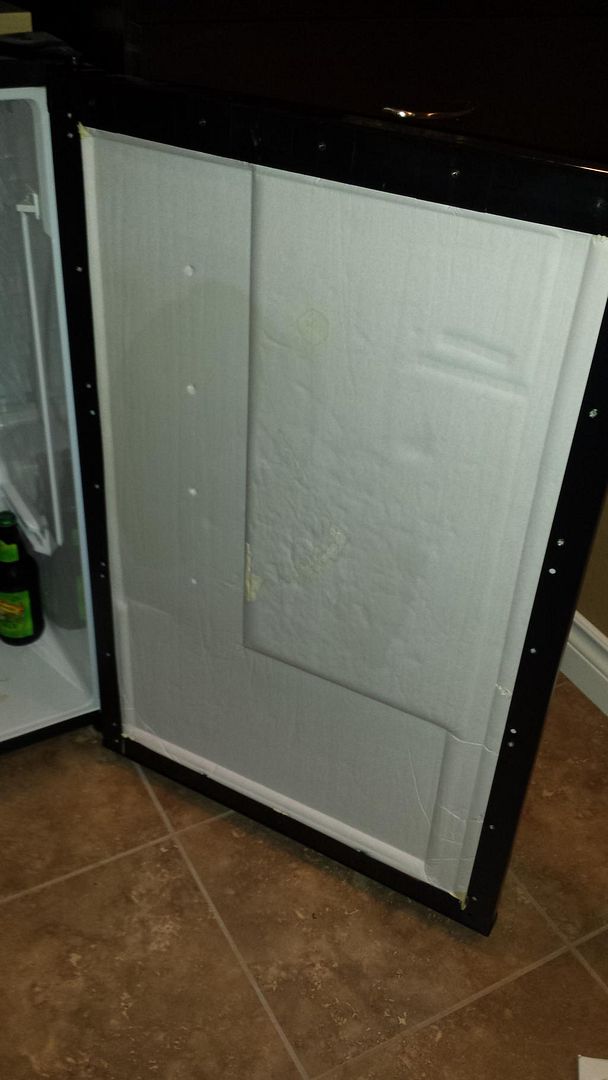
I stripped the insides out of my Magic Chef MCBR440W mini fridge.
It will easily fit my two 2.5 gallon kegs and co2 canister and double regulator.
I bent the freezer compartment as far back as I could and didn't kink the line.
Here is the door with the bottle organizer removed.
Last edited by Banjo-guy on Wed Jun 03, 2015 6:41 am, edited 1 time in total.
Cool! Nice little project. Are you thinking of putting a tower on it or just run picnic taps like I do.
Naked Cat Brewery On Tap
Yazoo Sue Smoked Porter
Octoberfest
Le Petite Saison
Czech Pale Lager
A Toast to Big Fuzzy Russian Imperial Stout at 10%
Belgian Blond
Flower Power IPA
4 Kilts Clueless Belgian Strong
One Wort Two Yeast with Wyeast 2206
One Wort Two Yeast with WLP940
Shipwreck Saison
What material should I cover the door with now that the insulation is exposed? I think that I need to provide a vapor barrier to the inside of the door.
I'm going to put 2 taps in the door. For now I'll use my quick disconnect inside the fridge
I'll move the thermostat to make more space.
Hopefully there will be room for the two taps.
Nice. Doesn't the sphincter get a good workout when you bend the freezer plate? I always expect to hear the dreaded his of a leak.
Have you thought about spray foam? Not sure how easy that would be to apply to the door but I'm sure you can buy some thin fiber board or styrofoam to put on the door.
PABs Brewing
Planning Brew good beer and live a hoppy life Fermenting
Drinking
Disfucted
Smelly Hops
(split batch) A Many Stringed Bow Up Next
Men In Black
I basically used whiteboard material from Lowes to cover my insulation. Use the old door insert as a pattern to cut around and for the screw holes. Then put the old door seal on that and screw to the door. works like a charm.
Added bonus, you can write notes about each beer on the inside of the door with a dry erase marker!
Also, I had some issues keeping the temp steady with just the fridge thermostat, so I picked up another STC-1000+ and made a temp controller. Much more stable temps now.
I just read through the post on your build. It really turned out well! I love the tower through the counter top.
I see that AIH has a sale on the Perlick Stainless Steel 630ss Perl Faucet for 40.00.
I need a shank as well and handle. Is there anything else I need to order?
Can I use my existing picnic tap lines to connect?
I just want to avoid missing part thats I should of bought.
gwcr wrote:I basically used whiteboard material from Lowes to cover my insulation. Use the old door insert as a pattern to cut around and for the screw holes. Then put the old door seal on that and screw to the door. works like a charm.
Added bonus, you can write notes about each beer on the inside of the door with a dry erase marker!
White board is a good idea. I'm not really sure what that is. Is it dry erase material?
I wonder if I need to provide a good seal for moisture.
Thanks. It was a stressful but fun build. I would have been terrified to bend the freezer coils like you did. Great job!
I suppose you could use your existing picnic tap lines, but I would suggest getting new lines and connectors. It's always good to have a spare picnic tap or two around. They come in handy. Plus, you may want to play with your line length. I started with 10' with the intent to cut, but didn't need to. With the shank through the door you might not need as long of lines, but it is way easier to make the lines shorter than longer...
I'd also suggest getting new lines. Like Glen suggested, you might want to star with 10-12 feet and after a few pours, you can easily cut the lines to whatever size works best reducing about 6" each time.
This link has some info to help as a good start but it's always better to start with a little more then cut if needed. http://beersmith.com/blog/2011/07/14/ke ... raft-beer/
PABs Brewing
Planning Brew good beer and live a hoppy life Fermenting
Drinking
Disfucted
Smelly Hops
(split batch) A Many Stringed Bow Up Next
Men In Black
gwcr wrote:I basically used whiteboard material from Lowes to cover my insulation. Use the old door insert as a pattern to cut around and for the screw holes. Then put the old door seal on that and screw to the door. works like a charm.
Added bonus, you can write notes about each beer on the inside of the door with a dry erase marker!
White board is a good idea. I'm not really sure what that is. Is it dry erase material?
I wonder if I need to provide a good seal for moisture.
I've seen many people using that white board, and with the original seal in place you don't have to seal anything else, i.e. moisture's not going to get behind the white board.
I have over 9,000 posts on "another forum", which means absolutely nothing. Mr. Beer January 2014 Brewer of the Month with all the pomp and circumstance that comes with it...
Certificate in Brewing and Distillation Technology
Beers I regularly brew:
Bell's Best Brown clone
Irish Hills Red - I call this "Ann Arbor Red"
Mackinac Island Red - I call this "Michigan Red"
Oatmeal Stout - I call this Not Fat, Stout - Oatmeal Stout
Bottled 5 gallons of Ann Arbor Red on 4/18/17. Bottled 5 gallons of Michigan Red on 5/8/17.
Brewed in 2017 - 22.13 gallons (19.91 in 2012, 48.06 in 2013, 61.39 in 2014, 84.26 in 2015,46.39 in 2016)
Brewed in lifetime - 282.14 gallons
Drinkable beer on hand - 13.58 cases, with 6.11 cases ready in May and early June.
Average cost per 12 pack through all beer brewed - $6.27(ingredients only)