Page 2 of 2
Re: First Time eBIAB Process
Posted: Mon Sep 08, 2014 1:18 pm
by braukasper
Vince I run a HERMS. I use a finer crush then I did with mashing in the cooler. Thanks for starting this thread a lot of great info.
Re: First Time eBIAB Process
Posted: Mon Sep 08, 2014 1:20 pm
by Kealia
FWIW, I double crush my grains for BIAB and always have. The one time I got them at a place that crushed them for me I forgot to ask about double-crushing and I had the lowest efficiency I've ever had (same grain bill as before).
I'm sold on that but YMMV.
Re: First Time eBIAB Process
Posted: Mon Sep 08, 2014 1:54 pm
by russki
Vince - I will second Jeff's recommendation to hold back some of the water for a 10 gallon batch; I typically use about 3 gallons of water to get to 12.5 gallons pre-boil, which leaves me 11 gallons to the fermenters. You will boil off at least 1.5 gallons - trust me! I don't double-crush my grains, but I do squeeze the bag when doing 10 gallon batches. My efficiency is 70% pretty much every time.
When are you brewing your first batch?
Re: First Time eBIAB Process
Posted: Tue Sep 09, 2014 11:48 am
by ScrewyBrewer
So many good ideas form so many experienced brewers, my winning combination has been posted by them I'm sure. Now to pick the one that's a best fit for my rig. This week the counter flow chiller should be delivered and if I move fast I could brew my first batch this weekend, either that or next weekend for sure. I don't have a way to heat water in a separate kettle to 170F but I like the idea of sparging the grains to hit my target volume.
I still have to mark the side of the kettle in one gallon increments to indicate how much wort is in there before the boil and after. As it stands now I think my first try will be to add all 22 pounds of grain and 12.5 gallons of water to the kettle, let the grains drain out and add some make up water as needed. It would be nice and easy doing everything in one shot using the kettle's heating element to maintain the boil and not worry about heating up sparge water in another pot. Anyhow there's going to be a learning curve here for me as I learn how to dial it all in to get the best conversion and ease of use.
Re: First Time eBIAB Process
Posted: Wed Sep 10, 2014 6:40 am
by ScrewyBrewer
The counter flow chiller arrived yesterday and in much better shape than I had feared it would. I bought it from Midwest Supply and it came with free shipping and 10% off holiday sale price too. When I unpacked the chiller the copper tubing wasn't bent, looked very clean and the stainless steel mounting bracket was solidly welded to the bottom of the coil. I had read some pretty bad reviews on another brewing site and was a little concerned about receiving a badly packaged coil so I placed the order with Midwest Supply instead.
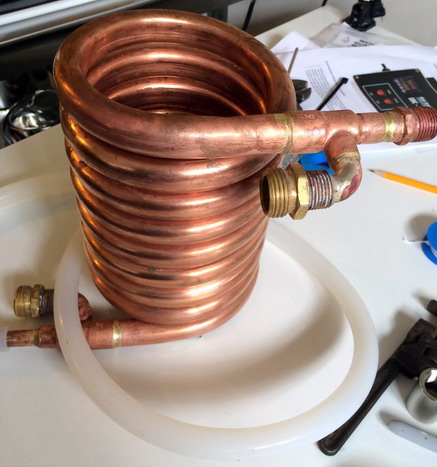
- counter-flow-1sml.jpg (66.23 KiB) Viewed 4662 times
I bought an extra length of 1/2 inch silicone tubing to connect the chiller to the kettle and fermentor, it's the same diameter tubing used to connect the Chugger pump to the kettle. I plan to run to the hardware store today to buy the fittings needed to adapt the chiller to use all 1/2 inch tubing. In the meantime I'll be ordering some
HFC 35 Series Polypropylene High-Flow Quick Disconnects from usplastics.com with the idea in mind to connect the pump to the chiller for whirlpooling in warm weather and also using gravity feed through the coil to the fermentor in colder weather.
Re: First Time eBIAB Process
Posted: Wed Sep 10, 2014 6:41 am
by RickBeer
Remember the dowel solution of marking off gallon increments (or partial gallons) and sticking it in to see how much you have (thanks to The Hat). I use it instead of marks.
Re: First Time eBIAB Process
Posted: Wed Sep 10, 2014 6:10 pm
by braukasper
One the BYO issues of the past couple of months. Has a nice little tutorial on how to etch your own kettle.
Re: First Time eBIAB Process
Posted: Wed Sep 10, 2014 6:35 pm
by Inkleg
Re: First Time eBIAB Process
Posted: Thu Sep 11, 2014 7:18 am
by ScrewyBrewer
Oh man, etching looks like an awesome DIY project too! Thanks for sharing I never would have thought of it myself, who knew? Your link got me to calculate the usable volume of my 62 quart kettle and it came out to only 52 quarts after subtracting the volume above the shoulder of the kettle where the basket sits. There's no point in brewing a batch until I know that the volume markings are exactly correct. My tried and true method is to fill a one gallon container with water, pour it in the kettle and then write down the measurement from the bottom of the kettle to the waterline repeating the steps until the kettle is filled. Once that's done I can then transfer the measurements to a dowel, or if I feel ambitious enough etched markings on the inside of the kettle for a really professional look.
The etching posts were one of the most interesting threads I've read in a long time. It just goes to show you can continue to learn something new brewing related everyday.
Re: First Time eBIAB Process
Posted: Thu Sep 11, 2014 10:00 am
by russki
Vince - what about installing a
sight glass? I have one on my kettle and love it - not only does it make measuring volumes super easy, it also lets me see if the mash is recirculating too fast so I can adjust the pump output. All you need to install it is a step bit to make a hole.
Re: First Time eBIAB Process
Posted: Thu Sep 11, 2014 11:51 am
by DaYooper
I'm pretty lazy and just mark my stiring spoon. That way I have one less thing to clean and keep track of in my pig pen of a garage.
Re: First Time eBIAB Process
Posted: Thu Sep 11, 2014 12:52 pm
by ScrewyBrewer
russki wrote:Vince - what about installing a
sight glass? I have one on my kettle and love it - not only does it make measuring volumes super easy, it also lets me see if the mash is recirculating too fast so I can adjust the pump output. All you need to install it is a step bit to make a hole.
Haha, wow another great idea and one that would logically work best with a RIMS system. I'm definitely glad I created this thread and appreciate all the ideas and feedback everyone has contributed!
Re: First Time eBIAB Process
Posted: Fri Sep 12, 2014 8:05 am
by BlackDuck
I've been thinking about the sight glass too. For those of you with one, do you take it off to clean after every session, or do you just let the PBW or cleaner of your choice get it there and do it's job? I would think you would have to take it off to get it properly cleaned.
Re: First Time eBIAB Process
Posted: Fri Sep 12, 2014 8:23 am
by Beer-lord
I PBW in the kettle then take my hose and force water thru it to rise it out.
I just ordered a site glass brush this week to use for better cleaning though so far, after about 15 uses, I've got no problems with a PBW soak and a good, fresh rinse.
Re: First Time eBIAB Process
Posted: Fri Sep 12, 2014 2:17 pm
by ScrewyBrewer
Getting back to the counter flow chiller install I finally stopped scratching my head and decided to mount the chiller under the table top. I used a 13 inch long length of 5/16 inch all thread as a hangar after drilling holes in the chiller bracket and the table top. Before mounting the chiller I let it soak overnight in a mixture of powdered brewery wash and warm water before rinsing it off really good with clean tap water.
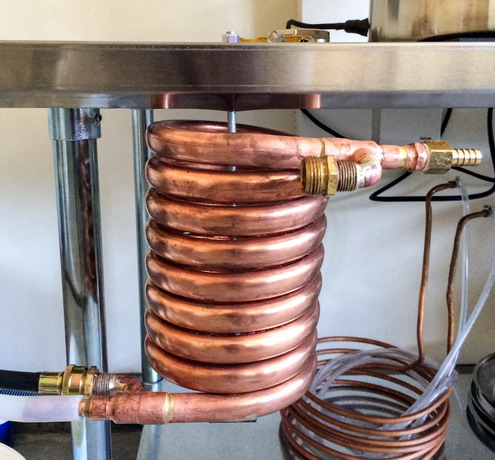
- chiller-1sml.jpg (84.41 KiB) Viewed 4587 times
I have the remaining 1/2" Hose Barb HFC 35 Series Polysulfone elbows on order now to complete the connections, looks like I'll be doing my first brew on the new rig next weekend!