DIY Mash Tun

There are so many gadgets and other stuff you can use to brew! Ask, learn and share what you got here!

Moderators: BlackDuck, Beer-lord, LouieMacGoo, philm00x, gwcr

User avatar
gwcr
Moderator
Moderator
Posts: 1404
Joined: Mon Aug 05, 2013 9:11 am
Location: Cedar Rapids, IA

DIY Mash Tun

Post by gwcr »

I was having a hard time doing 5 gallon BIAB batches, so I decided to convert a cooler to a Mash Tun. I’d had this cooler for about 10-15 years or so. Picked it up at a garage sale and only used it a couple times. Now it gets to have a new purpose in life. My cooler was a bit different size wise from most of the instructions that I found online, so I had to use some different sized parts to make it work.
Image

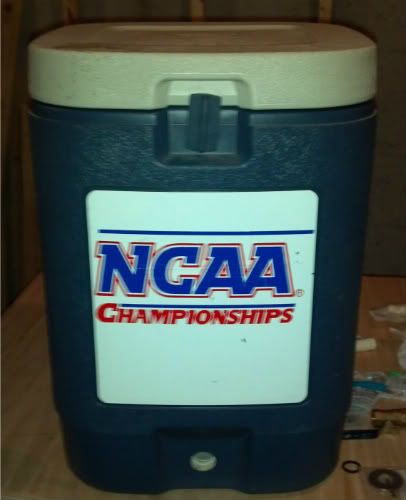
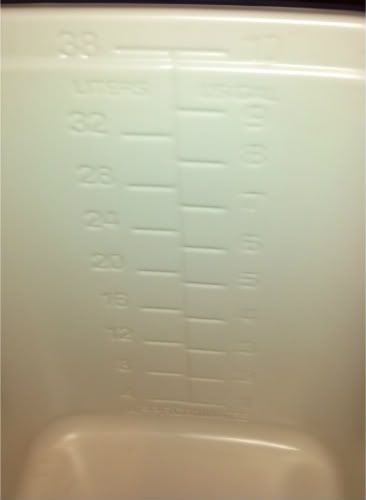
This is a 10 gallon Coleman cooler with markings on the inside for both gallons and liters. Lucky me!
Image

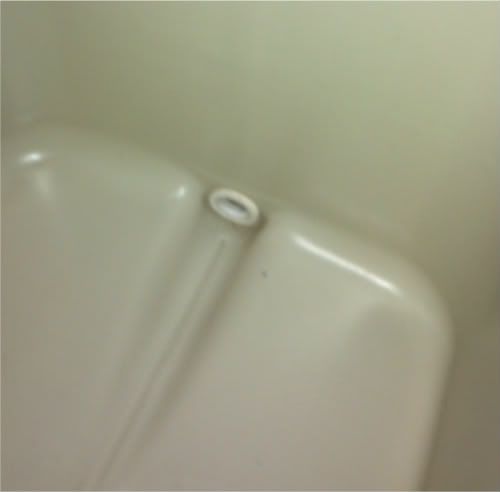
Very easy to remove the spigot. Make sure you save the inner rubber gasket. You will need it to seal properly.
Image

The size of the hole and thickness of the wall was a little bigger than I expected, so I had to return the 3/8” parts I was planning on using (from instructions on HBT), and get 1/2” parts. Here is the parts list I ended up with:

½” threaded ball valve
½” barb x ½” MIP hose adapter (2)
½” barb x ½” FIP hose adapter
½” MIP x 2” brass nipple
¾” fender washers (4)
¾” ID O-ring (4)
½” CPVC transition adapter
½” CPVC 90 degree elbow (4)
½” CPVC tee (3)
½” CPVC pipe
Teflon tape

First, I attached the ball valve to the 2” brass nipple, then one of the MIP hose adapters to the ball valve. Make sure to use Teflon tape on all the treaded joints to prevent leaking. After a few test fits through the cooler, I found that I needed 3 washers on the outside of the cooler for spacing.
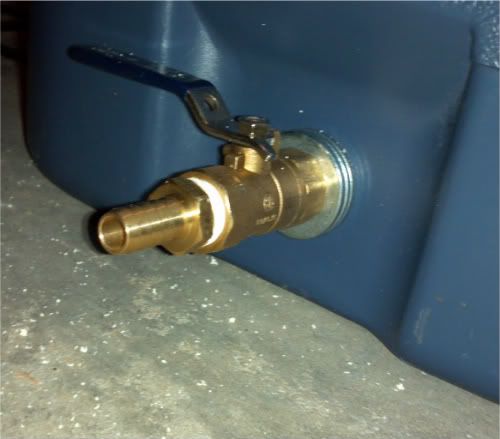
Image

I ended up using 4 of the O-rings on the brass nipple between the inside and outside of the cooler. That gave me the best seal, but I’ve seen some use only one. Then I attached the FIP hose adapter to the inside end of the brass nipple using one washer and the original gasket from the cooler. Got it nice and tight and filled with a couple gallons of water to check for leaks. So far so good.
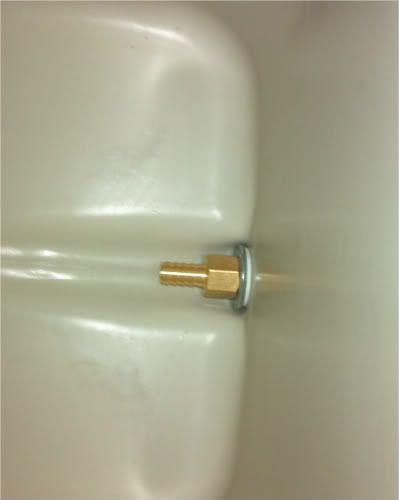
Image

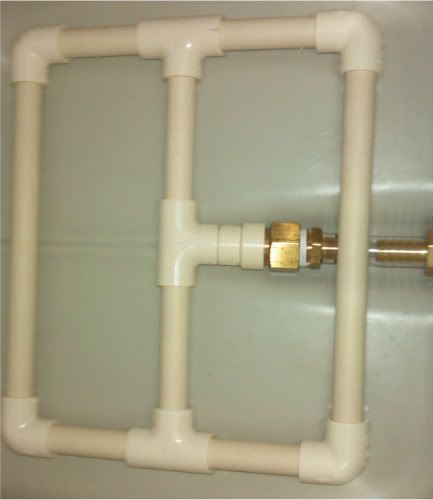
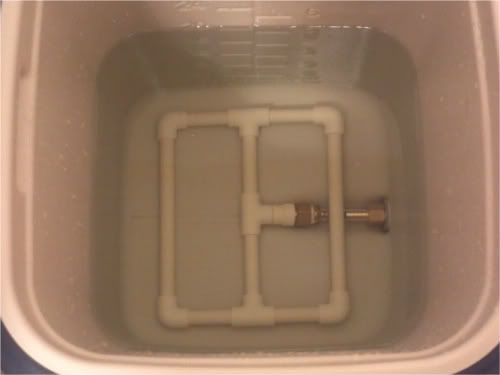
Now it was time to build the CPVC manifold. I sized it to fit about and inch from the sides, and drain from the center to help reduce any channeling of the wort down the sides of the cooler. I used a hack saw and miter box to cut the slots in the CPVC pipe, and the joints are all just slip fit so it can be taken apart for easy cleaning.
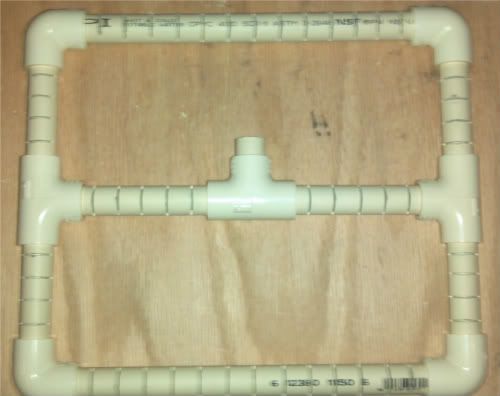
Image

Then I attached the CPVC transition adapter to the center tee, and added the last MIP hose adapter. A short length of ½” ID hose connects the two hose adapters together.
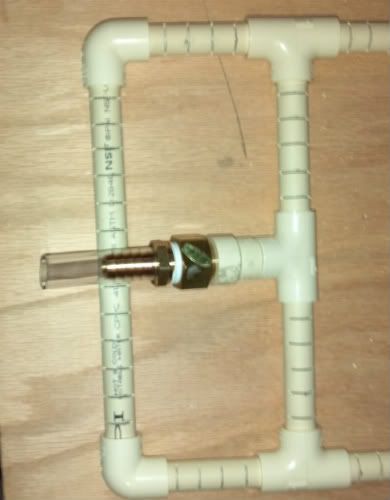
Image

Image

Time to test the full system. I filled it with 5 gallons of water, and let it sit for an hour.
Image

No leaks!! I drained the water though the manifold and ball valve, and that worked great. Looked like a good flow rate to me. After it drained, there was only 1 cup of water left in the cooler!

If you are thinking about making one of your own, go for it! You may need to adapt some of the parts for whatever cooler you have, and be a little creative on connecting the manifold, but it is a pretty straight forward project. This was a lot of fun to build, and it works great!
Last edited by LouieMacGoo on Thu Aug 08, 2013 1:15 pm, edited 1 time in total.
Reason: sticky
Fermenting: Bucket 1 - Fresh Squeezed IPA; Bucket 2 - Empty

Kegged: Keg 1 - Irish Red; Keg 2 - Cream Ale; Keg 3 - Amber Ale; Keg 4 - APA; Keg 5 - Empty; Keg 6 - Empty; Keg 7 - Empty
The reason why the above list is so small Home Theater Build
User avatar
philm00x
Moderator
Moderator
Posts: 2990
Joined: Tue Jul 09, 2013 9:11 pm
Location: Winter Park, FL
Contact:

Re: DIY Mash Tun

Post by philm00x »

Definitely bookmarking this one. It's something I've wanted to do for a long while, but I need to upgrade my brew pot before doing this. I can only accomodate 2.5 gallon batches right now with my current equipment.
Official page of Mr. Rufus Brewing Co.

Up Next
Koning Oranje

Currently at Mr. Rufus Brewing Co.
Fermenting
Nothing :(
Conditioning
Nothing :(
Drinking
58. Choco Brown
60. Etcitra, Etcitra
61. Bubs' Pale Wheat Xtra
62. Ottoberfest
Brew Queue
ROAR! Bacon
Bombay
Saint Sebastian Tripel
Bubs' Pale Ale

User avatar
Beer-lord
Moderator
Moderator
Posts: 9635
Joined: Mon Aug 05, 2013 2:48 pm
Location: Burbs of the Big Easy

Re: DIY Mash Tun

Post by Beer-lord »

Awesome job on the mash tun. I thought of going that route but went to a bigger pot and stuck with BIAB brewing as I've got my system pretty much where I won't it.

This could be a sticky!
PABs Brewing
Planning
Brew good beer and live a hoppy life
Fermenting

Drinking
Disfucted
Smelly Hops
(split batch) A Many Stringed Bow
Up Next
Men In Black
User avatar
LouieMacGoo
Site Admin
Site Admin
Posts: 1846
Joined: Fri Jul 05, 2013 12:09 pm
Location: S.E. Michigan
Contact:

Re: DIY Mash Tun

Post by LouieMacGoo »

Beer-lord wrote:Awesome job on the mash tun. I thought of going that route but went to a bigger pot and stuck with BIAB brewing as I've got my system pretty much where I won't it.

This could be a sticky!
BAM, Stuck! :cool:
Worrying can spoil the taste of beer more then anything else! ~ Charles Papazian

Find out more about Yeast, Hops, Grains and Cleaning & Sanitizing
Whats Brewing

Fermenting:

#40 - Citra-Nilla Cream Ale IPA - Brewed:9/20/15

Conditioning:
#39 - Dead Fly IPA - Brewed: 8/29/15 Bottled: 9/27/15
#38 - Apricot Hefeweizen (Colab w/Adam at SOL)- Brewed: 8/8/15

Drinking
#36 - Summer Wheat: Oberon Clone - Brewed: 7/11/15
#37 - Hickory Bourbon Honey Porter - Brewed: 7/18/15
#33 - Younger No. 1 Scottish Strong Ale - Brewed: 3/29/15
#28 - Hard Mulled Cider, Brewed 10/11/14 Kegged
#29 - Strawberry Lime Cider, Brewed/10/19/14 Kegged

Gone
#34 - Second Runnings IPA - Brewed: 3/29/15
#32 - Harvest Nugget Smash v2 (TBD) Brewed 11/27/14
#35 - Columbus Pale Ale - Brewed: 5/02/15
User avatar
gwcr
Moderator
Moderator
Posts: 1404
Joined: Mon Aug 05, 2013 9:11 am
Location: Cedar Rapids, IA

Re: DIY Mash Tun

Post by gwcr »

Cool! My first sticky thread!

:thanks:
Fermenting: Bucket 1 - Fresh Squeezed IPA; Bucket 2 - Empty

Kegged: Keg 1 - Irish Red; Keg 2 - Cream Ale; Keg 3 - Amber Ale; Keg 4 - APA; Keg 5 - Empty; Keg 6 - Empty; Keg 7 - Empty
The reason why the above list is so small Home Theater Build
User avatar
JimH
Brew Master
Brew Master
Posts: 623
Joined: Fri Aug 02, 2013 9:56 pm
Location: Bremerton, WA

Re: DIY Mash Tun

Post by JimH »

Alright, so I am new to these but keeping my eye out for when I decide to upgrade my brewery (if all goes well, Christmas-time!). I have seen a few posts about making these, and one I remember talked about a false bottom, but you don't use one. If I gather correctly, you just sawed grooves in the CPVC and then installed it groove side down. Does this help drain the water, but not the grain? How well does this work, because this looks like an easy conversion!
Jimbo Homebrew Co.
----------------------------------------
Drinking:
Keg1:
Keg2:
Keg3:
Bottled:
Nothing!
Fermenting:
Fermenter 1 (5 Gal Bucket): Empty :(
Fermenter 2 (1 gal.): Empty :(

On Deck:
Something?!
User avatar
gwcr
Moderator
Moderator
Posts: 1404
Joined: Mon Aug 05, 2013 9:11 am
Location: Cedar Rapids, IA

Re: DIY Mash Tun

Post by gwcr »

There are 3 common "drainage" systems for a MT.

1. SS Braid or "Bazooka" type screen
2. False bottom
3. Manifold

You can DIY a braid and/or manifold, but a false bottom is something you should buy. People use all three types (and probably others) and have good results. Depends on how you want to do it. I chose the manifold because it covers a larger area than a braid, and unless you reinforce a braid it has a tendency to collapse. Since my cooler is square, a traditional false bottom wouldn't work, and they can get pricey for a serial DIYer.

I cut the grooves almost halfway through the CPVC (you can also use copper pipe). Installing it upside down has two benefits. First, it helps to keep it from getting a stuck sparge as the weight of the grain isn't directly on the opening. Second, since you have a siphon going when draining the MT, having the slots on the bottom leaves less liquid in the MT than if they were on the top.

It is a pretty easy conversion. Just make sure you size the parts appropriately for the thickness of the cooler and diameter of the drain hole.
Fermenting: Bucket 1 - Fresh Squeezed IPA; Bucket 2 - Empty

Kegged: Keg 1 - Irish Red; Keg 2 - Cream Ale; Keg 3 - Amber Ale; Keg 4 - APA; Keg 5 - Empty; Keg 6 - Empty; Keg 7 - Empty
The reason why the above list is so small Home Theater Build
User avatar
FedoraDave
FedoraDave
FedoraDave
Posts: 4208
Joined: Fri Aug 09, 2013 5:52 pm
Location: North and west of the city
Contact:

Re: DIY Mash Tun

Post by FedoraDave »

Very similar to my build, although I used a 5-gallon round cooler I bought at Home Dopey. But the fittings and the manifold are pretty much identical. Nice job!
Obey The Hat!

http://www.homebrew-with-the-hat.com

Some regard me as a Sensei of Brewing
Fedora Brauhaus
Up Next:
FedoraDave's American Ale
Fermenting/Conditioning
Natural 20 Pale Ale -- Bull Terrier Best Bitter -- King Duncan's Porter -- Schöenwald Schwarzbier -- Littlejohn's Ale
Drinking:
Crown Top Pale Ale
User avatar
FrozenInTime
FrozenInTime
FrozenInTime
Posts: 2812
Joined: Mon Aug 05, 2013 10:19 pm
Location: Frozen Tundra

Re: DIY Mash Tun

Post by FrozenInTime »

Nice write-up! Very nice tun! I did one up using a 10 gallon round cooler and a stainless steel bazooka. I need to make a smaller one to use for steeping.
Life is short, live it to it's fullest!
User avatar
BlackDuck
Moderator
Moderator
Posts: 5156
Joined: Wed Aug 07, 2013 7:49 am
Location: Canal Winchester, Ohio

Re: DIY Mash Tun

Post by BlackDuck »

Very nice...I use a similar manifold only in a 10 gallon round cooloer:

Fully Assembled:
ManifoldTogether.jpg
ManifoldTogether.jpg (13.78 KiB) Viewed 9979 times
Apart to Clean:
ApartToClean.jpg
ApartToClean.jpg (14.6 KiB) Viewed 9979 times
Inserted into Tun:
ManifoldInTun.jpg
ManifoldInTun.jpg (9.21 KiB) Viewed 9979 times
ANTLER BREWING
Drinking
#93 - Gerst Amber Ale
Conditioning and Carbing

Fermenting

On Deck
User avatar
philm00x
Moderator
Moderator
Posts: 2990
Joined: Tue Jul 09, 2013 9:11 pm
Location: Winter Park, FL
Contact:

Re: DIY Mash Tun

Post by philm00x »

Woohoo, I picked up a cooler today off a craigslist ad. 5 gallon one for 10 bucks, so it'll let me do full volume mashes for my LBKs. Hope to pick up the hardware to convert it relatively soon.
Official page of Mr. Rufus Brewing Co.

Up Next
Koning Oranje

Currently at Mr. Rufus Brewing Co.
Fermenting
Nothing :(
Conditioning
Nothing :(
Drinking
58. Choco Brown
60. Etcitra, Etcitra
61. Bubs' Pale Wheat Xtra
62. Ottoberfest
Brew Queue
ROAR! Bacon
Bombay
Saint Sebastian Tripel
Bubs' Pale Ale

User avatar
philm00x
Moderator
Moderator
Posts: 2990
Joined: Tue Jul 09, 2013 9:11 pm
Location: Winter Park, FL
Contact:

Re: DIY Mash Tun

Post by philm00x »

Sooooo I finally finished rigging up the spigot, but haven't configured a filter of any kind yet. Would a filter be necessary, or can you just recirculate the wort over the grain bed, using the grains as a natural filter, until the wort runs clear? If anything, I can just use my BIAB bag to hold the grain and filter the solids until I can get a bazooka screen or something.
Official page of Mr. Rufus Brewing Co.

Up Next
Koning Oranje

Currently at Mr. Rufus Brewing Co.
Fermenting
Nothing :(
Conditioning
Nothing :(
Drinking
58. Choco Brown
60. Etcitra, Etcitra
61. Bubs' Pale Wheat Xtra
62. Ottoberfest
Brew Queue
ROAR! Bacon
Bombay
Saint Sebastian Tripel
Bubs' Pale Ale

User avatar
gwcr
Moderator
Moderator
Posts: 1404
Joined: Mon Aug 05, 2013 9:11 am
Location: Cedar Rapids, IA

Re: DIY Mash Tun

Post by gwcr »

Personally, I wouldn't run it without some sort of filter. Without one, you will most likely get grain particles or husks in your BK. Don't want to boil those.

BIAB bag might not be a bad short term idea. Would make clean up a LOT easier too. However, if using the bag, you may as well continue to BIAB. Why add the extra step...
Fermenting: Bucket 1 - Fresh Squeezed IPA; Bucket 2 - Empty

Kegged: Keg 1 - Irish Red; Keg 2 - Cream Ale; Keg 3 - Amber Ale; Keg 4 - APA; Keg 5 - Empty; Keg 6 - Empty; Keg 7 - Empty
The reason why the above list is so small Home Theater Build
User avatar
philm00x
Moderator
Moderator
Posts: 2990
Joined: Tue Jul 09, 2013 9:11 pm
Location: Winter Park, FL
Contact:

Re: DIY Mash Tun

Post by philm00x »

Yeah, that's the whole thing, I'm trying to not use the bag anymore, but finances were keeping me from buying everything all at once. I sacrificed buying some parts for the conversion in order to buy ingredients to brew. The biggest advantage right now w/ the tun and still using the bag is to make higher gravity beers I couldn't do in the pot because of its size.
Official page of Mr. Rufus Brewing Co.

Up Next
Koning Oranje

Currently at Mr. Rufus Brewing Co.
Fermenting
Nothing :(
Conditioning
Nothing :(
Drinking
58. Choco Brown
60. Etcitra, Etcitra
61. Bubs' Pale Wheat Xtra
62. Ottoberfest
Brew Queue
ROAR! Bacon
Bombay
Saint Sebastian Tripel
Bubs' Pale Ale

User avatar
Brewbirds
Brew Guru
Brew Guru
Posts: 2814
Joined: Tue Aug 06, 2013 7:32 am
Location: A Tree Somewhere

Re: DIY Mash Tun

Post by Brewbirds »

philm00x wrote:Yeah, that's the whole thing, I'm trying to not use the bag anymore, but finances were keeping me from buying everything all at once. I sacrificed buying some parts for the conversion in order to buy ingredients to brew. The biggest advantage right now w/ the tun and still using the bag is to make higher gravity beers I couldn't do in the pot because of its size.
Uhhmmm EXCUSE ME but you are busted. You have been caught not only posting outside of SMEIBBs Corner but actually speaking in non-SMEIBB tongue. This is blasphemy and MUST stop. :dunno: :o :(
Sibling Brewers
Post Reply